PCS
Email Set-up Procedure
Step 1:
FILE
LOCATION
The file PcsEmail.mde should be located in the program
folder along with the census program (pcs.mdb)
The name of this folder will vary, depending on which
version of Microsoft Office you are using

Example:
c:\pcs\prg2k\
c:\pcs\prgXP\
Click
here for larger image
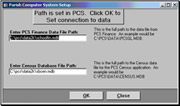
Upon
opening PcsEmail.mde for the first time, this program
will read from the census program the location of
the
pcs data files. You will be prompted with a screen
to confirm the location.
You just need to click OK. You may not edit the data
path from this screen.
When
you see the message “All database tables found”,
click OK.
 Step
2: Step
2:
MAIN
MENU
You
will next see the main menu of the PCS Email program,
with three buttons.
Click
here for larger image
The Reattach Data button takes you
back to the screen previously described.
The Select Email button takes you
to the screen where you can select the group of people
who will receive an email, OR just print a report
of the available email addresses without actually
sending the emails.
The Quit App button stops the program.
Step
3:
 Click
here for larger image Click
here for larger image
You
may construct the group of desired recipients by using
a combination of the round selection buttons,
the dropdown menus, and the groups named in the ‘Selection
Criteria’ list box.
Depending on the Selection Criteria selected, you
may be prompted with further options:

At any point, the resultant list of recipients will
appear in real time in the “Selected Members”
field.
At
the bottom of the screen, the List/Email
condition will default to be in the LIST
position, from where you can print a list of the members
in the “Selected Members” field along
with their email addresses and household ID.
Before
you can actually send emails to the members in the
“Selected Members” field you must change
the List/Email field at the bottom
of the screen to the Email position.
The Validate button will verify that
the email addresses entered in PCS Census meet the
following criteria:
- Contain only one @ symbol, which cannot be the first
character
- Contain no spaces, colons(:), or semi-colons(;)
- A period(.) is the 2nd, 3rd, or 4th character from
the right.
Select
Validate, then click List/Email.
If invalid email addresses are present, an Invalid
Email List report is produced.
Step
4:
In
addition, you must have an email program registered
as the default email program on your computer.
Click Start>Settings>Control Panel>Internet
Options > Programs tab.
If you have Internet Explorer version 6, your screen
will look similar to this:
 Click
here for larger image Click
here for larger image
Before you can send an email there MUST be a subject
in the SUBJECT field.

Additionally
you would want to put a MESSAGE for the body of the
email.
The
“email addressee” field will be used for
the “TO” field of the email. You may want
something generic here,
or even something fictitious but descriptive.
The
main group of email recipients furnished by the PCSEmail
program will be inserted into the BCC field. Doing
this respects the privacy of the recipients, so that
each recipient will not learn the email address of
every other recipient.
Step
5:
After
you click the List/Email button, your default email
program will open, showing a preview of the email
and the recipients.
If you had forgotten to fill out the “email
addressee” field, the ‘TO’ field
will show at this point as 'someone@microsoft.com'

Click here for larger
image
You
may cancel the email without sending it. If you do
cancel it, the message may appear in your INBOX
(not your Outbox) where you can delete it.
You
may choose to add a file attachment to your email
- add it in the usual way.
Then SEND the email.
You will receive no further prompting.
Click
the Menu button then the Quit
App button to exit |